Sunday, June 20, 2010

smoky eyes with make up

Simply follow the 7 easy steps below and before you know it, you’ll be rocking the gorgeous Smoky Eye Look yourself!


Step 1 – Getting Your Eyes Ready

Begin by applying a light shade of concealer to the under eye area, and all over the top lid. Your mineral makeup foundation is a great concealer for this step and prepares your Eyes for the eyeshadow that you are going to apply.

Step 2 – Using the Liner

First, line both the top and bottom rims with an eye pencil, paying close attention to going into the lash line itself.
If you have small eyes apply liner starting from the middle of the under eye to the outside of the eye. If your eyes are large feel free to line from corner to corner.
Hint: If you are using liquid liner you can place dots on the lash line and then follow the dots to get a perfectly straight line. I knew those connect the dot puzzles I did as a kid would come in handy some day!

Step 3 – Adding the Shadow

With a small eye shadow brush or a q-tip, soften the edges of the eye pencil line.
Apply a dark shadow using a sponge-tip applicator, smudge brush or a q-tip directly over the penciled area and smudge. (If you prefer, you can use your finger tip.)
The shadow helps to set and soften the look.

Step 4 - The Final Touch

Next apply a lighter shadow in a neutral tone with a larger eye shadow brush, I like to use the wet/dry brush.
Encircling the entire eye area, be sure to soften and graduate outward for that perfect blended look.
Add Mascara!
In case you haven’t found your perfect mascara yet, you will love this post on best mascaras, called Best Mascaras – Expert Reviews. I was doing a research to finally find the mascara that worked for me and it turned into a nice post on the best mascaras out there. But back to the Smoky Eye…

Step 5 – Cleaning up The “Territory”

Brush away any shadow that has fallen below the eye with a fluffy brush and clean up any areas that have smeared with a q-tip.
Step 6 - Going Super-Dramatic
Want a more dramatic look add more Shadow and Mascara! If you are looking for the most dramatic effect be sure to curl those lashes and apply 2-3 coats of black mascara!
Hint: Want your eyes to look larger – Pull your liner upward when lining your bottom lashes instead of out from the top liner! This will make your eyes look larger and rounder!


Step 7 – Finishing up The Lips

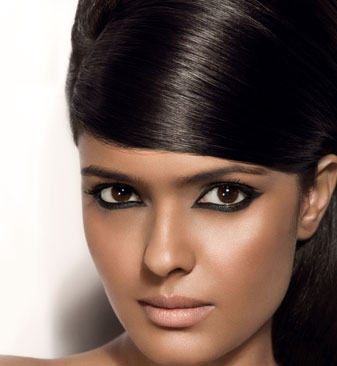
If you want to go for a classic smoky eye look, lightly line lips with a natural color and add some sheer color in peach, caramel, or barely there pink.
You might try the Nude look on the lips with your smoky eyes – see these 5 Tips on Embracing The Nude Lip Look to learn more…
If you want to add more drama to your look, line your lips with a darker lipliner and fill it in with a deep color to get that look from YSL, Dior and Armani beauty ads.
Both, the nude lip and the deep dark pout are very “it” this season. So, it’s up to you to decide which look is better for you.
And the last, but not least, don’t forget to put some natural looking blush on your cheeks. It will ad some color to your complexion.
Voila! You’ve got the look!

Wednesday, June 16, 2010

glossy eye shadows

Our Pressed Bare Mineral Matte Eyeshadows are Hypoallergenic, Talc Free, Fragrance Free and Oil Free. These Earthly Micro Minerals that are Infused with Conditioning and Protective Vitamins that the delicate eye area needs.
These Intense Eyeshadows Glide on Flawlessly and Last for Hours without Settling into Fine Lines, Creasing or Smudging. as each pigment is specially treated for extended wear. These Specialty Eyeshadows are part of our Professional Studio Collection and we use them on all major photo and television shoots. These Ultra Modern Matte Eyeshadows are Specially Formulated not to look cakey when applied and they make your eyes look less tired, less lined, less wrinkled and years younger.

matte eyeshadow

Electric Eel eyeshadow is a bright pop of blue. It’s a matte eyeshadow, but it’s smoother than most matte finishes. It is also ridiculously pigmented! If you find the texture too difficult, try Clarity eyeshadow instead, which is similar, but has a Matte2 texture, which is smoother and has a more buttery feel.

Freshwater eyeshadow is the perfect medium blue. It’s not light, but it also isn’t too dark. It has a veluxe pearl finish, which means it has shimmer in its texture, but it looks gorgeous because it is so richly pigmented.

Prussian eyeshadow is a dusty dark blue, and it has a matte finish (it is a Matte2 by definition). It’s smooth without being chalky, and it can add so much dimension to your look (as mattes often do).
Deep Truth eyeshadow is a rich dark navy blue with a frost finish, so it does have a good bit of shimmer in it. It can be used in blue, green, and teal looks. It also makes an amazing smokey eye when used with blues, grays, or silvers. This shade also has great pigmentation.

Plumage eyeshadow is a gorgeous shade of dark teal-blue with a matte finish. It’s an absolute must, because it offers a shade of blue that’s muted by a bit of teal, and yet it isn’t a teal.

Tilt eyeshadow is a shimmery periwinkle blue with reflection of green. Since it has so many characteristics, it can be very versatile when used in looks.
Passionate eyeshadow is a matte, bright red-pink. It’s not a true red, and it’s not a hot pink-it’s somewhere in between. It’s not always the easiest color to wear, and I definitely don’t think necessarily *everyone* should have it, but it’s a nice pop of color for anyone who will actually wear it!

Da Bling eyeshadow is a smooth, blendable medium warm-toned pink with gold shimmer. A lot of pinks tend to be cool or neutral, so it’s great to have one with a warm undertone (especially for those who have warmer complexions).

Expensive Pink eyeshadow is a peachy-pink that really makes pink way more wearable than you think. If you’re a little wary of hot pinks, bright pinks, and baby pinks-consider Expensive Pink. It has only a little bit of pink; I’d almost describe it as a dirty pink.

Hush eyeshadow is a sheer, shimmery highlighter with just a hint of pink. Hush makes a great all-over lid color in neutral looks, but it is a great way to highlight the brow bone when you are also wearing pink or purple eyeshadows. The touch of pink helps tie everything together.

Swish eyeshadow is a deeper fuchsia pink, which runs darker and has more dimension than a really bright fuchsia. It runs more fuchsia-purple than straight pink, but it can always be brightened by layering with a bright pink base, too.

Thursday, June 10, 2010

Liquid eyeliner

Liquid eyeliner should only be used above the top lashes. It is best to use a pencil or eyeshadow under the lower lashes. For a more dramatic look, use a colored kohl pencil above and below lashes and follow with a black liquid liner on the top. It will make your lashes appear darker and will stay on all day. A dark eye-liner highlights the shape of your eyes and deepens the look. Softly line with eyeliner pencil, draw a thin line along lashes next to roots.

For a dramatic look, lightly dot color along the lower lashes. For softness, line can be smudged with fingertip or Q-tip.

Eyeliner should be applied close to the base of the eyelashes. Products vary from cake to liquid liner to pencil. Practice makes perfect in achieving a fine line. Hold your head back and look down into the mirror. The eyelid will be tight and it will be easier to apply the liner. Smudge if necessary.

Don´t apply eyeliner in a thick line. It looks harsh and makes the eye appear heavy and tired. Get out of the 60´s and instead use a fine line. If you have trouble, use a brush to blend and smooth it out.

By using a line under the lower lashes gives the illusion of making the eyes appear larger. Instead of using a pencil, try using a small makeup brush with a dark eyeshadow. Apply into the lashes to make the lashes appear darker. Below this line apply a highlighter eyeshadow (in white, beige or yellow) in a fine line with a cleansed small brush. This will brighten the eye area.

There are pencil eyeliners, liquid eyeliner, and cake eyeliners. Pencil liners can be used above top lashes and under lower lashes. Liquid liners should only be used on the top lid. Cake eyeliners are used with water and can be used both top and bottom.

A smoky violet pencil looks best for someone with green eyes. On the color wheel, green and violet are opposite, and so they look well together. Also, look at nature when deciding on a color palette. Green, burnt orange and beige can be found in a field of autumn colors.

If you want to use the same liner pencil for eyes and lips I would recommend using an eyeliner pencil. Then you know this is safe for the eyes. Choose a shade that is a red-brown or a plum-brown. Then it will compliment your lipstick.

A liquid eyeliner or a cake eyeliner that you use with a fine brush will stay on the best. If you don´t feel adept at using these, pencils work well also. Pencils can be smudged for a subtle look. Always hold your head back, look down into the mirror, and apply your eyeliner. This will keep your eyelid skin tight and you can make a smooth line.

A typical way to apply liquid eyeliner is to line eye from the inside of the lashes outward in one big sweep. You can also line the eye from the middle of the lash line outward, then finish the line from the inner corner of the eye to the middle.
Another liquid eyeliner trick requires a steady hand and will make eyes appear wider.

Step 1: Start with a completely bare eye.
Step 2: Starting with the upper lashes, dot the liquid liner into the spaces between the lashes, wiggling the liner into the lashes. The result is not supposed to be a line. It's supposed to look as if the lashes themselves are super thick at the root.
Step 3: Apply mascara.

The Basic "I'm Off to Work or the Weekend," Eye

This is the perfect work or weekend look for women who want their eyes to "pop" without giving off the appearance of a woman who's really, really into makeup, so into makeup she has this site bookmarked in her Web favorites.
The key to the basic eye is to apply with a light hand. The basic eye is all about appearing natural so consider a deep brown liner if you have light hair.


USE OF EYELINER

Step 1: Holding the skin of your upper lid taut, trace the upper lashes from the inside of the eye with a pencil or an eyeliner brush dipped in a dark eyeshadow. For a more dramatic look, make the outside line a bit thicker than the inside and extend it just beyond the lash line. Another shape I love is dubbed the "Nike swoosh" by Lucky Magazine -- narrow at inner corners, thicker in the middle and swept up a bit at the outer edge.
Step 2: Once the line is set, trace over it with a liquid liner. Hand unsteady? Keep your elbow on a table.

Step 3: Set liner with an eyeshadow.

Step 4: Apply eyeshadow or an eye pencil to lower lashes.

Step 1: Holding the skin of your upper lid taut, apply eyeliner from the inside corner of the eye outward. Draw strokes into the lash line. The middle of the line should be a bit thicker than the edges.

Step 2: Use a cotton swap (or your finger, if you're lazy like me) to "smudge" the liner.

Step 3: Dab an eyeshadow brush into a deep-hued eyeshadow and apply over the eyeliner to set the line. (Blow on the brush first to remove any excess shadow). Layering liner with a shadow is the secret to a perfect smoky eye.

Step 4: Blend shadow well, then follow with eyeshadow. According to the March 2006 issue of InStyle Magazine, with a smoky eye, "color should diffuse from rich and dark near the lashes to almost sheer as it extends to the crease."

The Bold, Dramatic Eye

Bold eyes are a dramatic choice for evening. Try eyeliner shades other than deep black for a super cool look. You can use either a liquid liner or try the makeup artist's trick and use an angled eyeshadow brush dipped in a deep-hued eyeshadow. Skip the pencil for this look.
Step 1: Holding the skin of your upper lid taut, apply the liquid liner from the middle of the eye to the outside corner of the eye.

Step 2: Draw a second line from the inside corner of your eye, letting the two lines meet. The outer edge of the line should be thicker than the inside. If you have close-set eyes, avoid taking the line all the way to the inside corner.


EYE LINER (CAT EYE)

The Cat Eye

Forget the advice you may have read in the past never to line the inside rims of eyes because it makes eyes look tiny. Sexy cat eyes are a cool look for night. The key to this look is to apply a thin line to the inside rims of the lids. Make sure to sharpen the pencil after lining.
Step 1: Holding the skin of your upper lid taut, dot liquid liner along the upper lash line as close to the eye as possible. Apply line from corner to corner of eye, extending the line upward at the outer corner of eye. Let liner dry for a few minutes before touching.

To soften this look (black liquid liner can be harsh), InStyle Magazine suggests trying a smudgeable pencil in a lighter color like dark brown or charcoal.

Step 1: Hold down the lower lid and apply liner only to the outer three quarters of the rim. Fade out the line as you approach the tear duct, according to makeup artist Mally Roncal in the March 2006 edition of InStyle Magazine. Extend the liner upwards at the outer corners.

Step 2: Hold down the lower lid and apply liner only to the outer three quarters of the rim. Fade out the line as you approach the tear duct, according to makeup artist Mally Roncal in the March 2006 edition of InStyle Magazine. Extend the liner upwards at the outer corners.

For a softer version of this look, use an eye shadow brush and sweep a taupe or brown color on the lower lash line.

Sunday, June 6, 2010

Eye Make up


Prep your eyes with concealer Concealer can be used to cover up undereye circles or just the bluish discoloration just under your inner eye. To cover dark undereye circles, apply three dots of concealer under each eye. Start at the inner corner where skin tends to be darkest, then under the pupil and the third on the outer edge. Pat, never rub with your ring finger (this finger tends to have the softest pad) until it disappears.

Apply eye base to your lid eye based is the secret to keeping your shadow in place for hours. Without properly priming your lid first, your eyeshadow will likely end up a greasy line in your crease.

Apply shadow. It's great to use a three-toned shadow and build from lids to brow. Allowing them to blend into each other like a rainbow is gorgeous, according to celebrity makeup artist Mally Roncal. Start with a light color that almost matches your lid. Sweep the color across the lid and up to your browbone. Follow with a medium color across your lid only. Build on this with a darker color in the crease. Blend the colors well.
Follow with eyeliner Dark eyeshadows work great as eyeliners. Wet a slanted brush, then dip in a dark eyeshadow. Line eyes as close to the upper lashes as possible from the inner corner to the outer corner. Follow with liner on bottom eyes, but only line from the middle of the eye out. Smudge the bottom line with a Q-tip or your finger. You don't want a prominent line. For a smokey eye, use a brush to pat in a dark eyeshadow along the upper lid and below the lid. You don't want a stark line, instead you want to blend it so it's 'smudge-y.'

Brighten your eyes with a highlighter This step involves only the inside part of the eye. With a gold or pink highlighter (white is too bright), draw a v-shaped shape that follows the inner corner of your eye from top to bottom. Blend with your fingers. This will help make eyes 'pop.'
Highlight your brow Take the same highlighter and dab it on your browbone, concentrating on your mid-brow outward. Blend with your finger.
Curl lashes An eyelash curler will make even long lashes look more gorgeous. For added effect, you can heat the curler under a blowdryer for a couple seconds. Test curler before applying to lashes because you could burn yourself.
Apply mascara Place the wand of your mascara brush at the bottom of lashes and wiggle back and forth. Follow with another few sweeps of the wand. Apply to bottom lashes as well.

Friday, June 4, 2010

Eye Make up

Advanced Rounded Eye Shadows Application


1 Highlighter eye shadow across the eyelid, from the lash line to slightly beyond the crease, and all the way to the eyebrow.

2 Mid tone eye shadow on inner corner of lid.

3 Accent eye shadow on crease and in wedge; blend all well.

4 Line upper and lower lashes with with eyeliner pencil.

Eye Make up

advanced Rounded Eye shadow Application.


1 Highlighter eye shadow across the eyelid, from the lash line to slightly beyond the crease, and all the way to the eyebrow.

2 Mid tone eye shadow on inner corner of lid.

3 Accent eye shadow on crease and in wedge; blend all well.

4 Line upper and lower lashes with with eyeliner pencil.